Aged Relic CI/CD Process Update: Octopus Deploy
kosar

The third part of the article series on CI/CD process updates.
At this stage, we (hopefully) have a clear understanding of how CI will function: what we start with, how to reach the final result, and what needs to be done so that the build output becomes a full-fledged project module ready for deployment. We also have Octopus installed (preferably the LTS version). The previous part covered the TeamCity setup process: everything that happens from the moment code is pushed to the repository until we get a ready-to-unpack archive that theoretically should work.
Here’s a reminder of the table of contents:
- Part 1: What we have, why it’s a problem, planning, and a bit of bash.
- Part 2: TeamCity.
- Part 3: Octopus Deploy.
- Part 4: Behind the scenes. Pain points, future plans, and perhaps an FAQ. Semi-technical.
Octopus: Overview
We start with code as input and build artifacts as output. Straightforward enough. But the result for each module consists of two parts: a core package (the actual build output) and an individual package (unique configurations and libraries). So, for a particular module to function, we need approximately the following:
- A website in IIS with its own pool, “pointing” to the document root. Each module has its own pool.
- Core package files in the document root.
- Individual package files in the document root.
- Ideally, back up the existing contents of the document root before all this. Naturally, we’re confident in our setup, but people tend to fall into two types: those who don’t back up, and those who already do.
- Optionally (based on a setting), back up the module’s database (client requirement). There are regular backups elsewhere, but a fresh backup is better than one from the previous day.
- It would be nice to verify that what we’ve deployed actually starts and runs.
- Notify the chat of the result, if we deployed to production.
- Display the entire list of clients (domains) served by this module.
It’s not a huge list, but not a small one either. Step 1 is no issue - Octopus has a Deploy to IIS template with everything needed.
We’ll cover steps 2 and 3 in more detail below. For step 4, a prompted variable passed from TeamCity will suffice.
Step 5 is a PowerShell script, which will also handle backup rotation. Why keep them all when we can delete the older ones?
Step 6 is also PowerShell. Step 7 uses the Slack - Detailed Notification template. Step 8 is another PowerShell script.
Sounds like a plan—let’s implement it.
Tenants
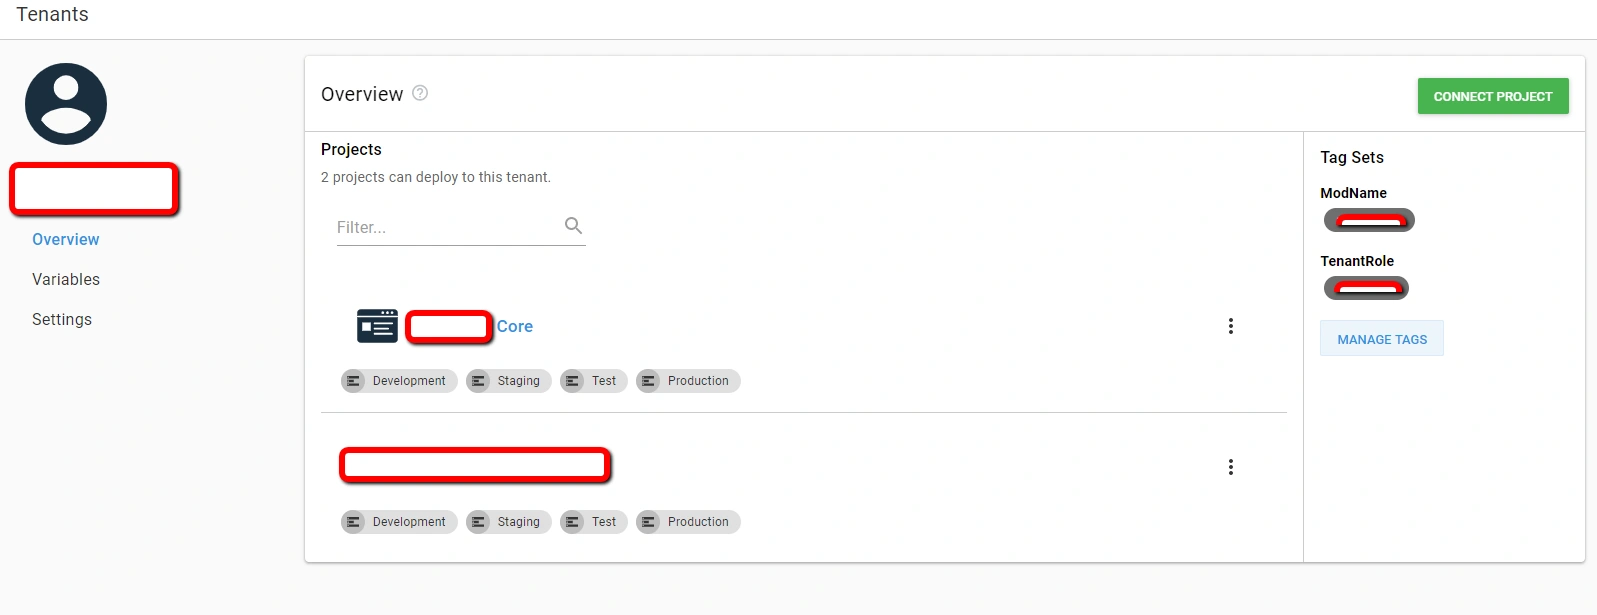
Let’s go into more detail on steps 2 and 3. I assume the reader is familiar with Octopus Deploy. If not - read the f***ing docs. So, we have project, infrastructure, tenant, library, task, and settings tabs. We need the tenants tab. "Tenant" in this context most likely means client. Octopus tells us tenants allow deploying different instances of a project for multiple clients (tenants) at once. Here’s what the tenant list page looks like:

In this case, tenants are used a bit differently. Each tenant represents an individual client. For each tenant,
you can add projects that will run upon deployment. Here, it will include the core project and the individual project.
Each tenant has two tags: TenantRole, common to all, indicating that a module of a specific type (core) is deployed to all tenants with this tag,
and ModName, a tag matching the module name (individual).
The latter is passed from TeamCity as a parameter, allowing identification of the currently deployed module (Deploy.Env and Deploy.2).
As seen in the screenshot, deploying a module for a specific organization first triggers the core project
(TeamCity deploy.2 step), followed by the individual project
(TeamCity deploy.3 and deploy.4 steps). Each tenant has access to variables
of all included projects as well as its own tenant variables (grouped in a variable set and containing the ModName tag).

A tenant is selected for deployment in TeamCity as follows:
env.tenantRoleTagvariable: contains the TenantRole (tenant tag name in Octopus) and its value;env.modName: value of the ModName tag in Octopus.
Variables
Variables are an important part of the project and should be structured properly. In this project, Octopus variables are divided into three types: common to all projects (grouped in the “Environment” library set), individual for each project (configured directly in the project), and tenant-specific variables (also a library set). The “Environment” library contains shared items for all projects, including:
- base paths to the document root (e.g.,
C:\inetpub\); - base URL (e.g., all modules share the domain
organization.com); - database credentials (used for backups);
- etc.
A major benefit is that Octopus allows environment-specific values for each variable. The separation can be configured in various ways.

For example, lines 3, 6, and 7 in the screenshot. Line 3 is the general case. Everything to be deployed in the production environment is included here. Lines 6 and 7 describe specific cases, such as the production environment with the “CompanyWebsite” role (line 6) and production with the “organizationX” tenant tag. This is necessary to identify the servers for the package, as organizationX, for instance, has a dedicated server.
Project-specific variables include everything else that is not common and differs between environments, such as the module’s full domain name.
In general, it’s formed as #{Tenant.ModName}.#{BaseModuleDomain}, but it may differ in certain cases.
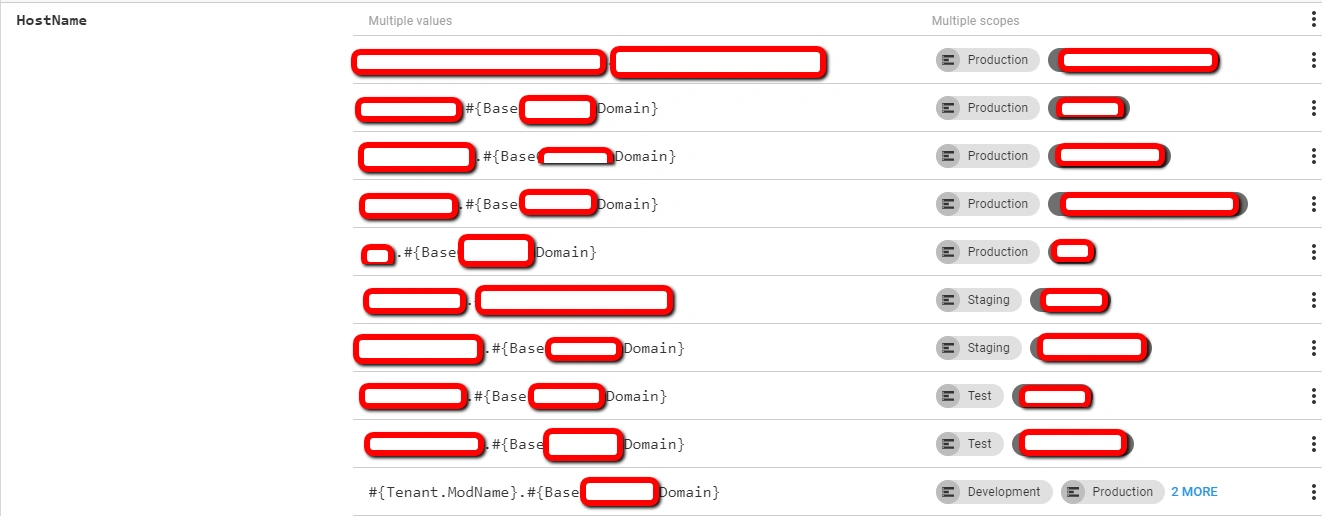
An example of such a case is shown in the image.
Channels
A quick word about channels: channels let you set deployment logic. The official documentation covers this brilliantly,
particularly here and here.
For example, only releases with the “stable” tag can enter the production channel, and so on. The project has four channels,
matching the environments (development, test, staging, production). Releases are routed to them according to pre-release tags,
set in the build number format of TeamCity’s (Build.General settings in the TeamCity section).
The channel is passed from TeamCity in Deploy.2 in the additional command line arguments field (parameter --channel).
Templates
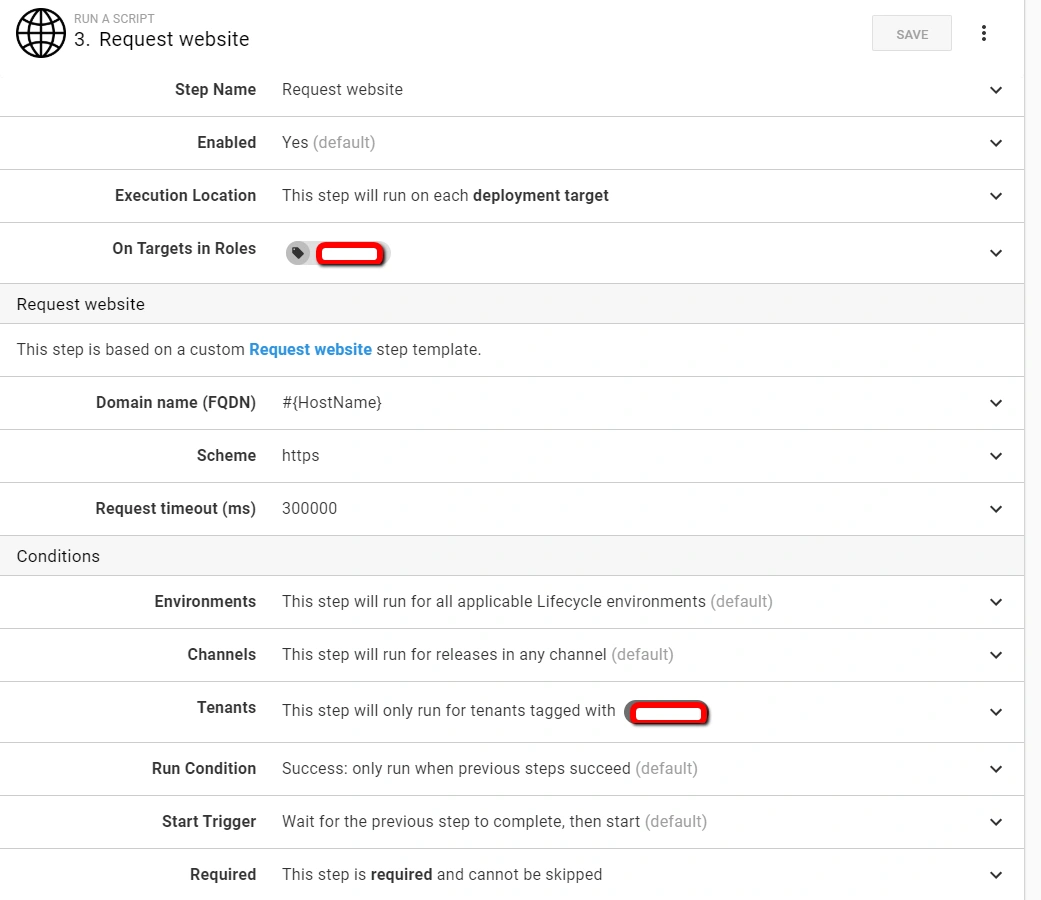
If you didn’t already appreciate the benefits of using templates from the TeamCity article, now’s the time. It’s advisable to template custom steps that are frequently used; otherwise, if changes are needed, you’ll have to recall where each step is used, click through each instance, and make updates each time. In this project, templates were created to check site functionality and return a list of domains back to TeamCity. Let’s briefly review the template creation process.
Here’s a PowerShell script to run after every module deployment.
$url = "$scheme" + "://" + "$domain"
Write-Host "Requesting '$url'"
[Net.ServicePointManager]::SecurityProtocol = [Net.SecurityProtocolType]::Tls12
$request = [System.Net.WebRequest]::Create($url)
$request.Timeout = $timeout
$response = $request.GetResponse()
$response.Close()
The script takes the scheme, domain, and timeout after which we consider the site non-functional. Create a template in Library - Step templates.
Enter a name, select an icon, and then set up input parameters and default values. Default values can also come from specified variables
(the variable value #{HostName} becomes the default value of the input parameter #{Domain}).
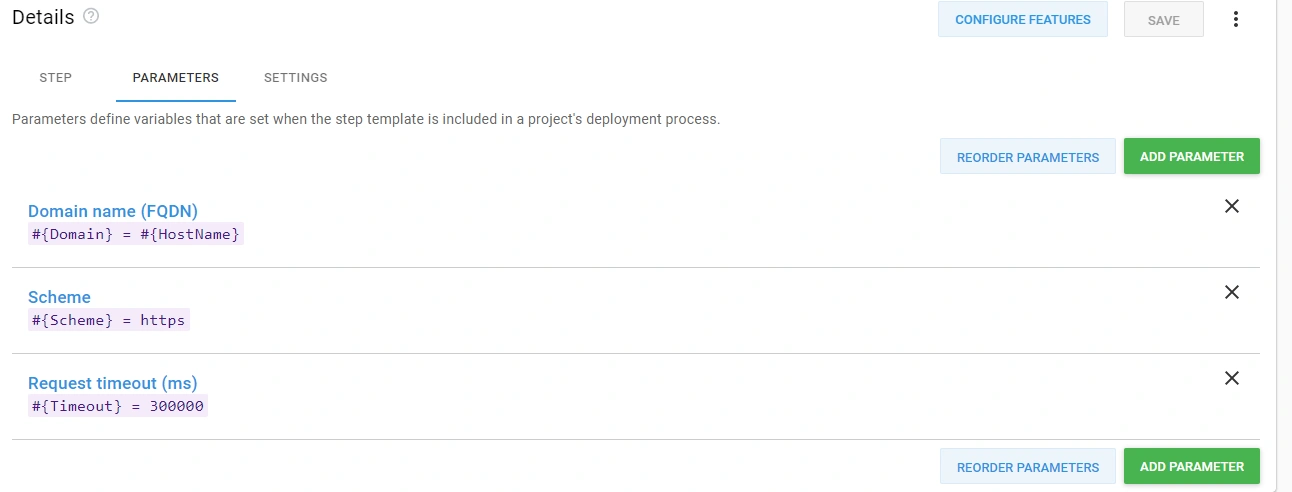
Next, slightly modify the script, and add it as an execution step:
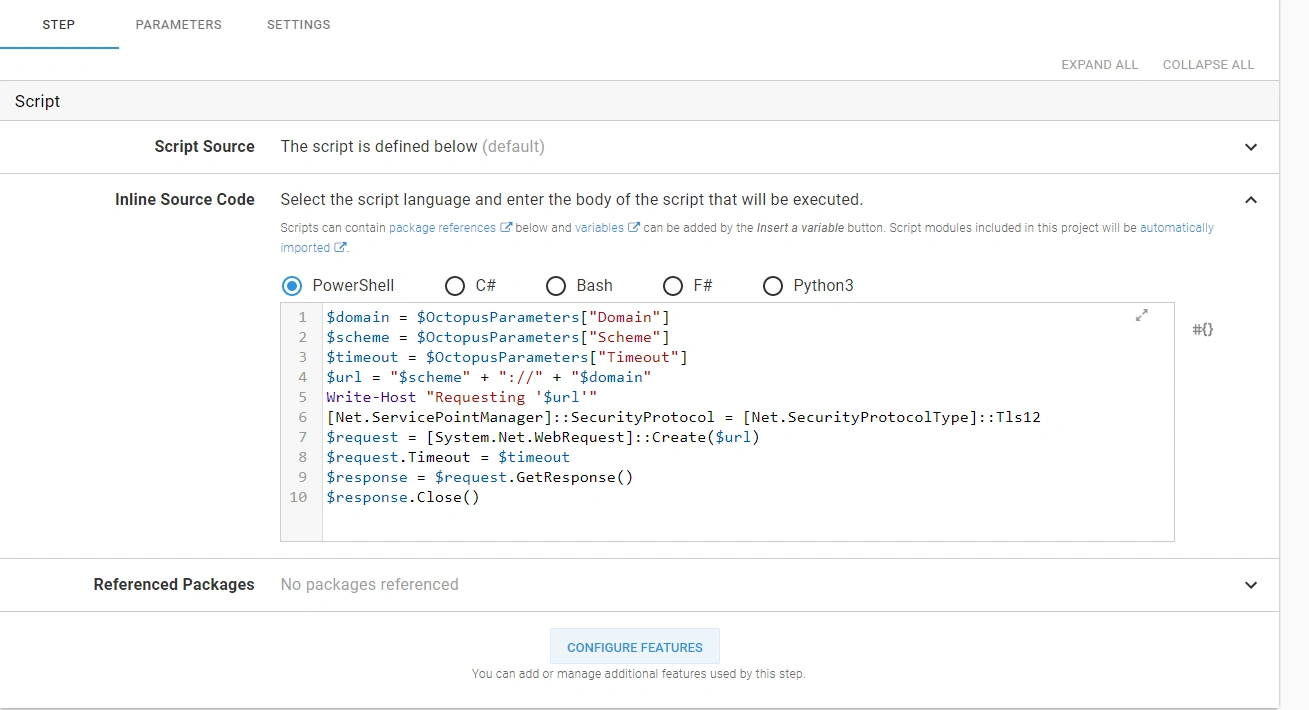
Done. The output is a user-friendly step template, and in our absence, colleagues can make sense of the fields without delving into obscure scripts.
Octopus: Deployment Process Details
All projects are grouped, and the description will focus on the Modules group. It contains:
- core;
- individual module projects.
Let’s start with the core project.
Here’s what the overview page looks like:
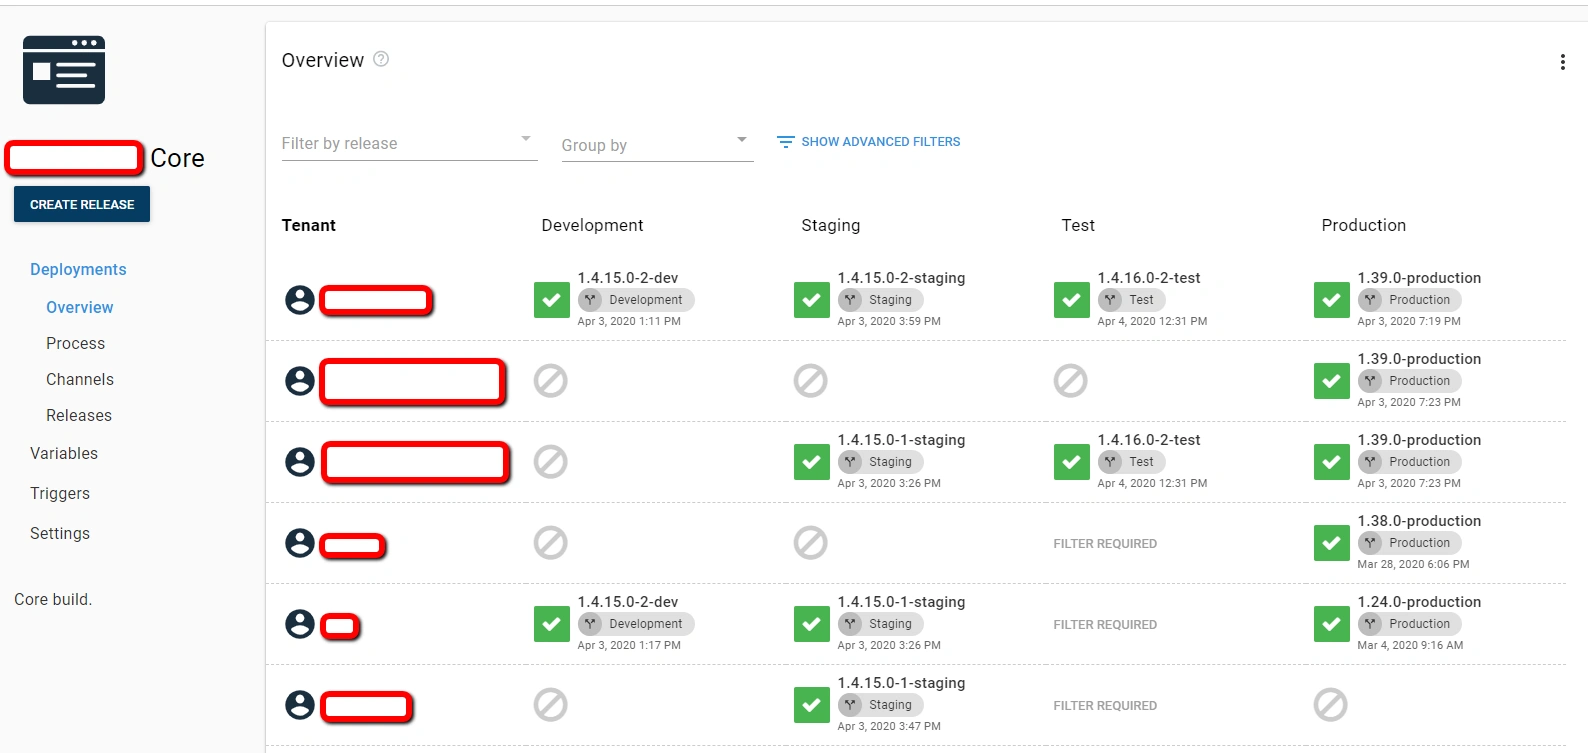
Here, you can see which core versions went where. Apologies for the mixed-up version numbers - we’re moving to Git tag-based versioning, and the new versioning is used everywhere except production.
As you can see, certain tenants lack specific environments. They’re either not created yet or weren’t planned.
Core Deployment Process
During core deployment, some maintenance tasks are also performed, namely database backup (if needed), previous files version backup, backup rotation, and core deployment.
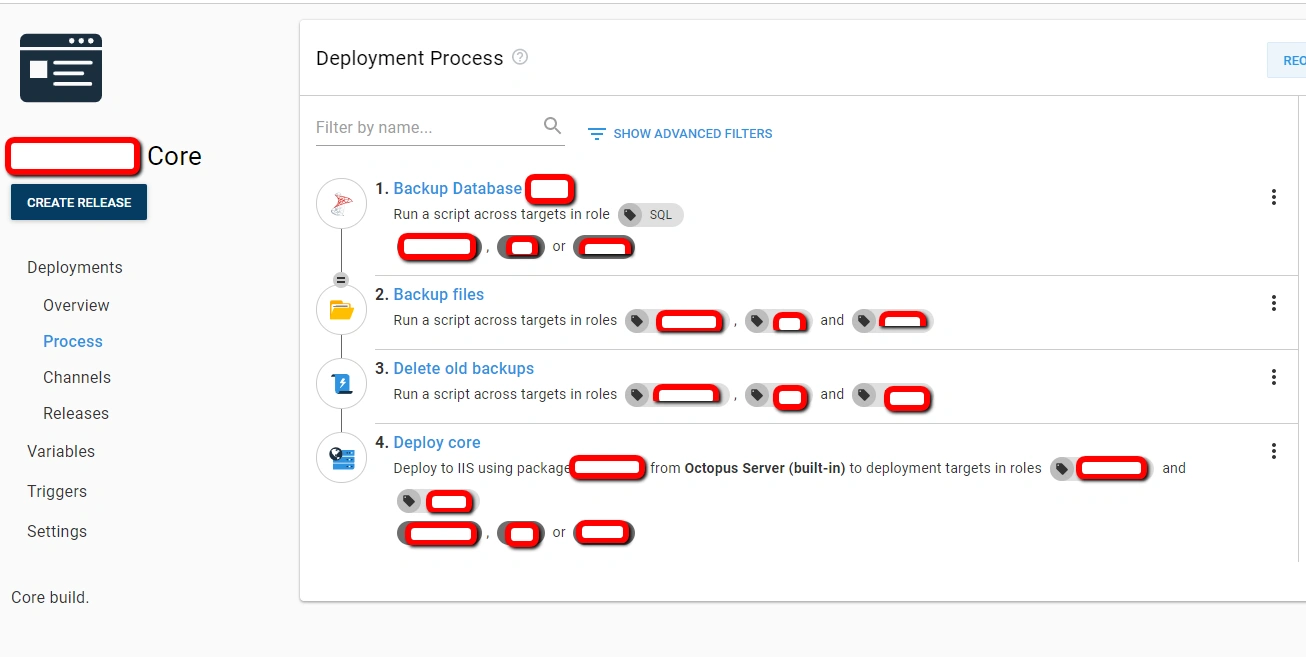
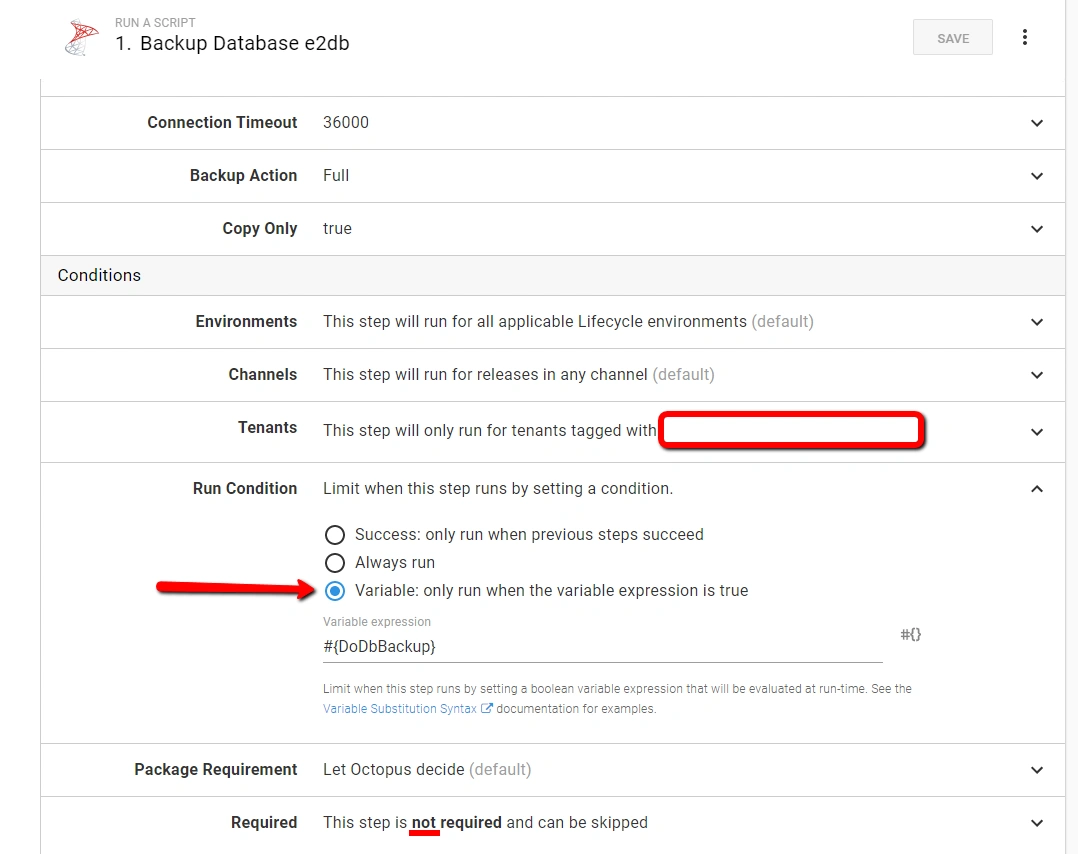
Step 1 - Database backup. This is optional, based on the variable passed from TeamCity in Deploy.2 under additional command line arguments. By default, this variable is set to false, as the database should only be backed up on request, not constantly. In TeamCity, launching with this parameter modified looks like this (click the three dots next to the run button):

In Octopus, it looks like this:
Nothing unusual from here. File backup in zip (templated), backup rotation (script below), and core deployment via template.
Key points to note:
- All critical parameters are set as variables, allowing quick changes in one place without digging into the process settings;
- The IIS pool name matches the instance name and service domain name (for convenience);
- In the IIS deploy step, “Merge with existing bindings” is set instead of “Replace.” Besides the service domain, each instance has a slew of client domains;
- Document root cleanup (checkbox “purge this directory before installation”) is not performed. New files replace the old ones during copying to prevent site crashes during deployment. A slight delay in loading is preferable to a death screen.
Backup rotation script:
$days = $OctopusParameters["DaysStoreBackups"]
$limit = (Get-Date).AddDays(-$days)
$pathDb = $OctopusParameters["DbBackupDir"]
$pathFiles = $OctopusParameters["FilesBackupDir"] + '\' + $OctopusParameters["HostName"]

# Delete files older than the $limit.
Get-ChildItem -Path $pathDb -Recurse -Force | Where-Object { !$_.PSIsContainer -and $_.CreationTime -lt $limit } | Remove-Item -Force
# Delete any empty directories left behind after deleting the old files.
Get-ChildItem -Path $pathDb -Recurse -Force | Where-Object { $_.PSIsContainer -and (Get-ChildItem -Path $_.FullName -Recurse -Force | Where-Object { !$_.PSIsContainer }) -eq $null } | Remove-Item -Force -Recurse

# Delete files older than the $limit.
Get-ChildItem -Path $pathFiles -Recurse -Force | Where-Object { !$_.PSIsContainer -and $_.CreationTime -lt $limit } | Remove-Item -Force
# Delete any empty directories left behind after deleting the old files.
Get-ChildItem -Path $pathFiles -Recurse -Force | Where-Object { $_.PSIsContainer -and (Get-ChildItem -Path $_.FullName -Recurse -Force | Where-Object { !$_.PSIsContainer }) -eq $null } | Remove-Item -Force -Recurse
Individual Package Deployment Process
At the individual package delivery stage, configurations and unique libraries are deployed, files are arranged and/or renamed, and the site is pinged (first-load on .NET sites takes time, so this step allows for this process to occur immediately and helps identify any errors upon loading). A notification is also sent to Slack, and the current list of all domains associated with this module is returned to TeamCity.
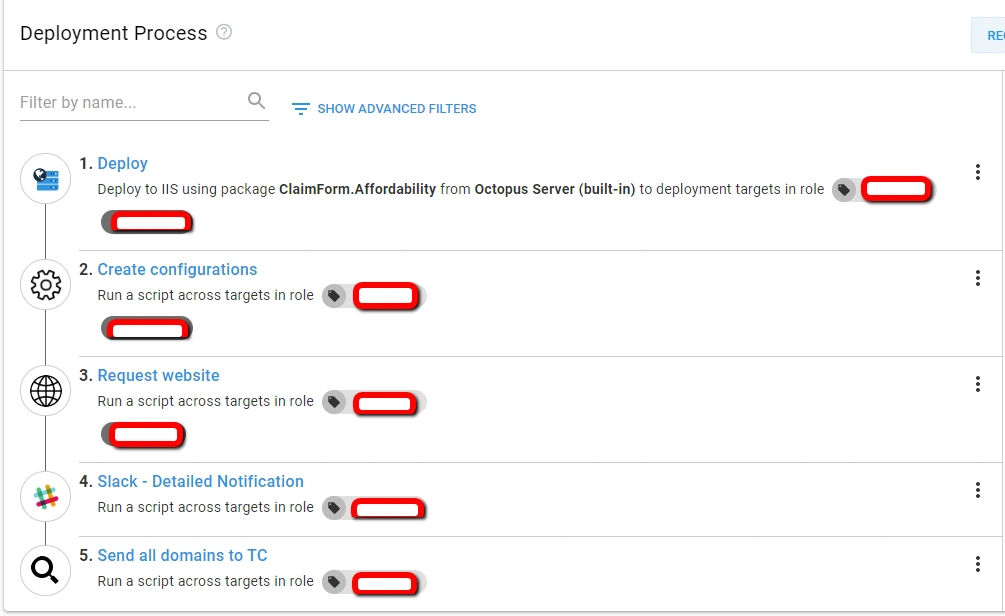
Key points:
- During the deploy step, the document root is not cleared (the new core package is already in place).
Step 3 script. This was covered earlier in the template descriptions.
Step 5, which corresponds to deploy.4 in TeamCity.
In Octopus, it looks like this:
$baseDomain = $OctopusParameters["HostName"]
$domains = (Get-WebBinding $baseDomain).bindingInformation | %{ $_.Split(':')[2] } | Sort-Object | Get-Unique
Write-Host "##teamcity[setParameter name='AllInstanceDomains' value='$domains']"
Write-Host "##teamcity[setParameter name='ServiceDomain' value='$baseDomain']"
The syntax ##teamcity… sets a build parameter in TeamCity. In TeamCity, this step looks like:
Write-Host "All domains on instance %ServiceDomain% :"
$domains = "%AllInstanceDomains%"
$domains = $($domains.Split(" ") | ForEach-Object {"http://$_"} | Out-String)
Write-Host $domains
Write-Host "Service domain: http://%ServiceDomain%"
Octopus: Summary
The complete build/deploy process looks as follows:
- Code is pulled from a specific branch corresponding to the environment.
- The build result (artifacts) is handed over to Octopus and consists of two parts: the core and the module’s individual package. This setup enables efficient disk space usage and saves overall update delivery time.
- Each package has a version consisting of a number and a pre-release tag, which determines the channel and environment the release will go to.
- Based on the input data, Octopus creates a release and delivers packages to the appropriate servers, guided by organization data (tenant tags), channels (pre-release tag), and additional instructions (optional database backup), as well as performing a basic module functionality check.
That’s about it. Most likely, there will be another semi-technical article, something like "behind the scenes." It will cover what didn’t fit here: specific details, updates that arose during the process, potential challenges for others considering a similar project, corrections and updates, and possibly FAQs.
Thank you for reading.